Hi All 🙂
So, we have a guide about configuring iSCSI initiator from Centos 7 with our Reduxio iSCSI Target. Now, let’s make it interesting – Let’s take an already created iSCSI mount point, with a vmware machine on it and mount the VMFS inside a CentOS machine.
First, we take an ESXi host (ESXi 5.5) and connect it to our Reduxio storage device (iSCSI). Create a VM, make sure it’s working, unmount the device from the ESXi.
Now we have an “orphan” iSCSI device, with a VM on it that we will try to access the VMDK file from inside a CentOS 7 machine.
By default Centos/Redhat doesn’t support that type of file system, so we had to make some tweaks.
So, let’s take a look in our environment below:
We have 1 iSCSI target (Reduxio) with the following network configuration:
4 Network adapters:

192.168.100.11
192.168.100.21
192.168.100.22
192.168.100.12
We have 2 iSCSI initiators ( ESXi host & Centos 7 Machine) with the following configuration:
1 Centos Network Adapter:

192.168.100.10
ESXi host storage name:

DataReduxio
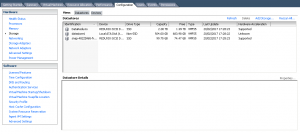
We can see that our volume (DataReduxio) is associated with the ESXi host and formatted to a VMFS. We will next mount this same volume to our Centos 7 Machine.
From our Centos 7 initiator:
Install the initiator package using yum command as shown:
yum -y install iscsi-initiator-utils device-mapper device-mapper-event-libs device-mapper-multipath lsscsi sg3_utils
Now, add or update the following parameters to the /etc/iscsi/iscsid.conf:
node.session.timeo.replacement_timeout = 10
node.conn[0].timeo.login_timeout = 15
node.conn[0].timeo.logout_timeout = 15
node.conn[0].timeo.noop_out_interval = 5
node.conn[0].timeo.noop_out_timeout = 5
node.session.initial_login_retry_max = 8
node.session.err_timeo.lu_reset_timeout = 300
node.session.err_timeo.tgt_reset_timeout = 300
node.startup = automatic
Create, copy & paste Reduxio entries to the device rule file:
# vi /etc/udev/rules.d/99-reduxio.rules
SUBSYSTEM=="block" , ACTION=="change", ATTRS{model}=="TCAS", ATTRS{vendor}=="REDUXIO", RUN+="/bin/sh -c '/usr/sbin/iscsiadm -m session -R '"
SUBSYSTEM=="block" , ACTION=="change", ATTRS{model}=="TCAS", ATTRS{vendor}=="REDUXIO", ATTR{size}=="0", RUN+="/bin/sh -c 'echo 1 > /sys$DEVPATH/../../delete '"
Create Multipath configuration file with the following command:
mpathconf --enable --with_multipathd y
Copy & paste the correct entries to the multipathing configuration file:
# vi /etc/multipath.conf
 devices {
	device {
		vendor "REDUXIO"
		product "TCAS"
		revision "2300"
		path_grouping_policy "group_by_prio"
		path_checker "tur"
		hardware_handler "1 alua"
		prio "alua"failback "immediate"
		features "0"
		rr_weight "uniform"
		path_selector "round-robin 0"
		no_path_retry "72"
		rr_min_io_rq 10
		rr_min_io 10
		user_friendly_names "yes"
		fast_io_fail_tmo "10" # wait up to 10 seconds before failing io.
	}
}
blacklist {
# Note: it is highly recommended to blacklist by wwid or vendor instead of device name
		devnode "^sd[a]$"
}
Now we can start and enable iscsi & multipathd on boot:
service iscsi start
service iscsid start
service multipathd start
chkconfig iscsi on
chkconfig iscsid on
chkconfig multipathd on
Go to the web interface in Reduxio and create a host.
(The previous tutorial explained how to create a new host and assign storage)
Give the host a name and insert the IQN that generated from our machine:
cat /etc/iscsi/initiatorname.iscsi
InitiatorName=iqn.1994-05.com.redhat:2566748c851ei
As soon you assign the volume (DataReduxio) with the new host (CentOS) from the Reduxio web interface you will be able to discover the volume from our Centos machine.
From the CentOS machine run the following command:
# iscsiadm -m discovery -t sendtargets -p 192.168.100.11
I randomly selected one network adapter that is shown in our environment –

You can see that our four Network adapters have been discovered.
We can now login to the iSCSI Target:
# iscsiadm -m node --login
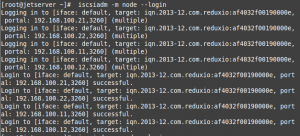
From the shown output, you can see that the login was successful.
We will confirm the established session:
# iscsiadm -m session -o show

If we will run the command fdisk -l we will discover our mapper –
# fdisk -l

**The following mapper is formatted as a VMFS volume. To mount is as file system inside CentOS, we have to install vmfs-fuse.
Install & enable the EPEL repository for additional packages
yum install epel-release
Install the following packages for userspace filesystems:
yum install gcc
yum install libuuid-devel
yum install fuse fuse-devel
Download the following vmfs-tools packgage:
wget http://glandium.org/projects/vmfs-tools/vmfs-tools-0.2.5.tar.gz
Extract the tar file
tar -xvzf vmfs-tools*
Run the following commands to install the vmfs package:
cd vmfs-tools-0.2.5
./configure
make
make install
Finally! we can mount our volume (VMFS) to our Centos machine!!
vmfs-fuse /dev/mapper/mpatha1 /mnt
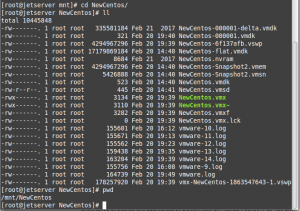
Now we can access the volume and sort all the vmdk files! 
Good luck!
Tags: iscsi, VMFS
Leave a Reply