Hi,
My name is Daniel Alum, CTO at Jetserver.
So, we’ve got a new “toy” from Reduxio that I wanted to play with 🙂
Reduxio’s flash hybrid primary storage solutions, based on the revolutionary TimeOS storage operating system, provides breakthrough storage efficiency and performance. It also provides the unique ability to recover data to any second, far exceeding anything available on the market today.
Let’s start first with configuring iSCSI initiator on a CentOS machine, and connect it to our new iSCSI Target (Reduxio)
iSCSI Initiator is a tool that connects external iSCSI-based storage to host computers with an Ethernet network adapter.
Typically, a computer is the initiator and a data storage device is the target.
Let’s take a look in our environment below:
iSCSI Target - Reduxio          iSCSI Initiator – CentOS 7 VM
4 Network Adapters:             1 Network Adapter:
192.168.100.11                  192.168.100.10
192.168.100.21
192.168.100.22
192.168.100.12
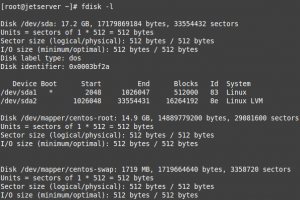
From our iSCSI initiator (CentOS), list partition table before the discovery of our iSCSI Target :
fdisk -l
# cat /proc/partitions
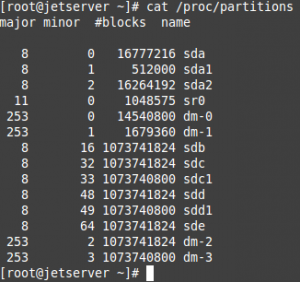
From the above output we can see that we have one disk (/dev/sda)
Now, let’s configure the iSCSI Initiator:
First, we have to install the initiator package using yum command as shown:
yum -y install iscsi-initiator-utils device-mapper device-mapper-event-libs device-mapper-multipath lsscsi sg3_utils
Before changing parameters in the initiator configuration file, back up the existing initiator configuration file:
# cp /etc/iscsi/iscsid.conf /etc/iscsi/iscsid.conf.bak
Now, add or update the following parameters:
node.session.timeo.replacement_timeout = 10
node.conn[0].timeo.login_timeout = 15
node.conn[0].timeo.logout_timeout = 15
node.conn[0].timeo.noop_out_interval = 5
node.conn[0].timeo.noop_out_timeout = 5
node.session.initial_login_retry_max = 8
node.session.err_timeo.lu_reset_timeout = 300
node.session.err_timeo.tgt_reset_timeout = 300
node.startup = automatic
Create, copy & paste Reduxio entries to the device rule file:
# vi /etc/udev/rules.d/99-reduxio.rules
SUBSYSTEM=="block" , ACTION=="change", ATTRS{model}=="TCAS", ATTRS{vendor}=="REDUXIO", RUN+="/bin/sh -c '/usr/sbin/iscsiadm -m session -R '"
SUBSYSTEM=="block" , ACTION=="change", ATTRS{model}=="TCAS", ATTRS{vendor}=="REDUXIO", ATTR{size}=="0",RUN+="/bin/sh -c 'echo 1 > /sys$DEVPATH/../../delete '"
Run this command to create a multipath configuration file:
mpathconf --enable --with_multipathd y
Create, copy & paste the correct entries to the multipathing configuration file:
vi /etc/multipath.conf
devices {
       device {
          vendor "REDUXIO"
          product "TCAS"
          revision "2300"
          path_grouping_policy "group_by_prio"
          path_checker "tur"
          hardware_handler "1 alua"
          prio "alua"failback "immediate"
          features "0"
          rr_weight "uniform"
          path_selector "round-robin 0"
          no_path_retry "72"
          rr_min_io_rq 10
          rr_min_io 10
          user_friendly_names "yes"
          fast_io_fail_tmo "10" # wait up to 10 seconds before failing io.
        }
}
blacklist {
# Note: it is highly recommended to blacklist by wwid or vendor instead of device name
             devnode "^sd[a]$"
}
Now we can start and enable iscsi & multipathd on boot:
# chkconfig iscsi on ; systemctl start iscsi.service
# chkconfig multipathd on ; systemctl start multipathd
We need IQN (iSCSI Qualified Name) to configure our iSCSI Target.
So Copy the IQN from our initiator:
# cat /etc/iscsi/initiatorname.iscsi

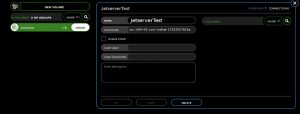
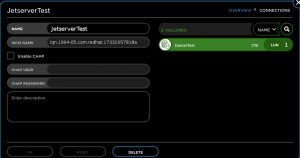
Now that we have the IQN from the initiator, Let’s configure a New host in the Reduxio web interface.
From the web interface -> Go to Hosts -> New host:
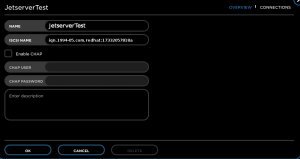
Confirm by clicking “OK”
We need a volume to assign to our new host, so let’s create one:
From the web interface -> Go to Hosts -> New Volume:
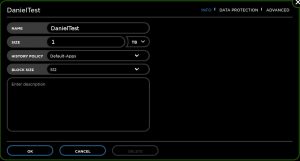
Confirm by clicking “OK”
Now we can assign the new volume we created to our host.
Expand the host box and click assign on the new volume.
Now that our new volume associated to the new host, We can discover our Target from our initiator!
From CentOS machine run the following command:
# iscsiadm -m discovery -t sendtargets -p 192.168.100.11
(I randomly selected one network adapter that is shown in our environment)

You can see that our four network adapters have been discovered.
We can login now to the iSCSI Target:
# iscsiadm -m node --login
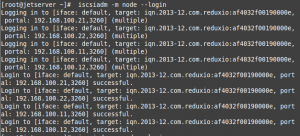
From the shown output, you can see that the login was successful!
We will confirm the established session:
# iscsiadm -m session -o show

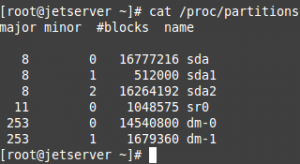
Now we can list the partition table after discovery our iSCSI Target:
# cat /proc/partitions
Let’s create a LVM Partition based on mapper disk:

# vgcreate reduxio /dev/mapper/mpathb

# lvcreate -l+100%FREE reduxio
![]()
# mkfs -t ext4 -c /dev/mapper/reduxio-lvol0
![]()
Now we can mount our new disk!
# mount /dev/mapper/reduxio-lvol0 /mnt
Add it to fstab:
/dev/mapper/reduxio-lvol0 /mnt ext4 defaults,usrquota,noatime 1 2
Tags: iscsi

Leave a Reply